9 Payment system
Pico payment is a game currency payment system based on the Pico account system, and the settlement method is based on the current game currency unit under Pico (P currency). If the project requires internal purchasing function, please read the contents of this chapter carefully. If the project does not require internal purchasing function, please ignore this chapter.
9.1 Preparations
9.1.1 Get the string used for payment
When developer accesses the payment SDK, an application needs to be created on the developer platform and the corresponding string should be gotten. The application process is as follows:
- Log in to the developer platform and register a Pico member (http://developer.pico-interactive.com/)
- Apply to become a developer
The developers are divided into individual developers and enterprise developers, please apply according to the actual situations. After the review is submitted, we will provide feedback within 3 working days, please view the status of the developer platform in time.
- View merchant ID
After applying to become a developer, click the nickname in the upper right corner to view the developer ID, which will serve as the unique symbol of the merchant in the payment system:

Figure 9.1 Merchant ID
- Get the corresponding string
Developers can enter the application creation phase from the management center. After clicking Create Application, first select the platform to publish:
Then enter the corresponding platform to perfect the relevant information of application:
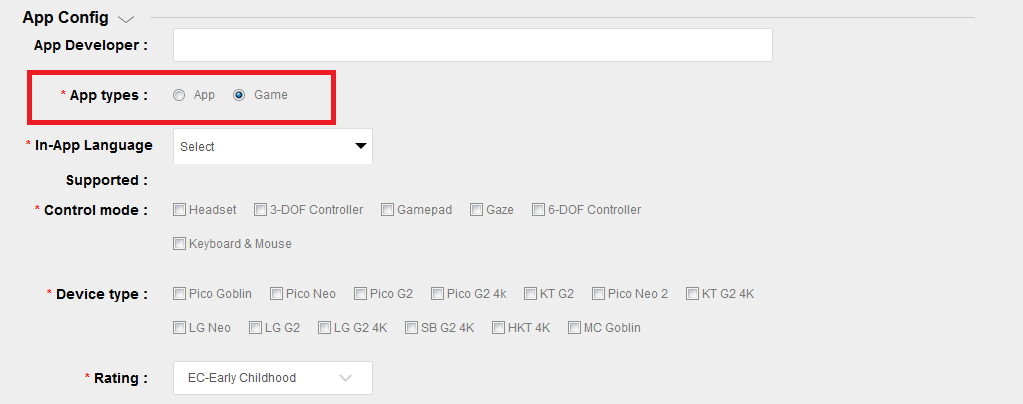
Figure 9.2 Information about application improvement
Please pay key attention to the red position of the above figure, please fill out the application type carefully, and it can’t be modified once you fill it out! If there is a case of external payment of props for game applications, we require the developers to use the way of adding product code in the background of developers for unified management.
Description of payment methods:
Currently, there are two payment methods: one is P currency payment (application type) and the other is product code payment (game type). Only one payment method can be used for the same application.
After the application is successfully created, the developer platform will assign a string to it, including APP ID, APP KEY and APP Secret. The developers will also be assigned a developer ID:
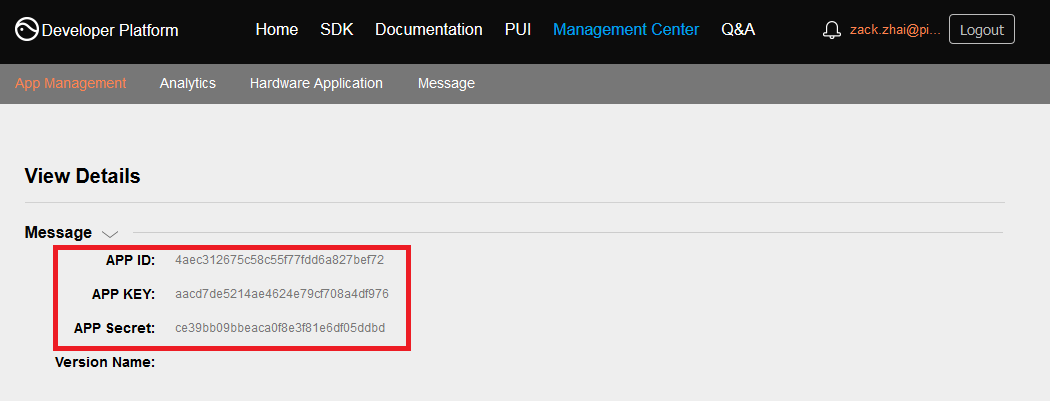
Figure 9.3 APP ID, APP KEY, APP Secret
And then select “In-game payment configuration” and configure the game’s internal purchase information:
Attention should be paid that the rule of the product code is defined as follows: ‘the first letter is a letter, only the entry of letters and numbers is allowed, and it should not be more than 20 characters’. The product code between different props cannot be repeated. The prop types are divided into consumable prop and non-consumable prop. Consumable prop are reusable commodities, such as gold currency, blood bottle, etc. Non-consumable props are disposable purchased products, such as weapons and unlocking levels.
9.1.2 Use the string for payment
Please be noted: if features including user login, payment or retrieving user info from Pico platform are required, please use configurations as described below. If the features above are not required, this chapter can be skipped. The values need to be content with the ones acquired in step 4, chapter 9.1.1
This SDK is integrated with AndroidManifest.xml. If your project does not include the AndroidManifest.xml, use the AndroidManifest.xml file in this SDK directly. If your project already has the AndroidManifest.xml file, please be sure to incorporate the following into your project’s AndroidManifest.xml:
> Necessary authority:
<uses-permission android:name="android.permission.INTERNET"/>
<uses-permission android:name="android.permission.ACCESS_WIFI_STATE"/>
<uses-permission android:name="android.permission.ACCESS_NETWORK_STATE"/>
<uses-permission android:name="android.permission.WRITE_EXTERNAL_STORAGE"/>
When selecting “China” as “Release area”, the following segments need to be included in Android Manifest:
<!--APPID-->
<meta-data
    android:name="pico_app_id"
    android:value="APP ID"/>                //Replace APP ID with the APPID applied by the application
<!--APPKEY-->
<meta-data
    android:name="pico_app_key"
    android:value="APPK EY"/>               //Replace APP KEY with APPKEY applied by the application
<!--Authorization Scope-->
<meta-data
    android:name="pico_scope"
    android:value="SCOPE"/>         //Replace the SCOPE with the fixed value get_user_info
<!--Developer ID-->
<meta-data
    android:name="pico_merchant_id"
    android:value="DEVELOPER ID"/>          //Replace DEVELOPER ID with the Developer's DEVELOPER ID
<!--Payment Key-->
<meta-data
    android:name="pico_pay_key"
    android:value="APP SECRET"/>            //Replace APP SECRET with APPSECRET applied by the application
When selecting regions other than “China” as “Release area”, the following segments need to be included in Android Manifest:
<!--APPID-->
<meta-data
    android:name="pico_app_id_foreign"
    android:value="APP ID"/>
<!--APPKEY-->
<meta-data
    android:name="pico_app_key_foreign"
    android:value="APPK EY"/>
<!--Authorization Scope-->
<meta-data
    android:name="pico_scope_foreign"
    android:value="SCOPE"/>
<!--Developer ID-->
<meta-data
    android:name="pico_merchant_id_foreign"
    android:value="DEVELOPER ID"/>
<!--Payment Key-->
<meta-data
    android:name="pico_pay_key_foreign"
    android:value="APP SECRET"/>
Note that selecting “Global” will include all regions, so both segments are required as follow:
<!--APPID-->
<meta-data
    android:name="pico_app_id"
    android:value="APP ID"/>                //Replace APP ID with the APPID applied by the application
<!--APPKEY-->
<meta-data
    android:name="pico_app_key"
    android:value="APPK EY"/>               //Replace APP KEY with APPKEY applied by the application
<!--Authorization Scope-->
<meta-data
    android:name="pico_scope"
    android:value="SCOPE"/>         //Replace the SCOPE with the fixed value get_user_info
<!--Developer ID-->
<meta-data
    android:name="pico_merchant_id"
    android:value="DEVELOPER ID"/>          //Replace DEVELOPER ID with the Developer's DEVELOPER ID
<!--Payment Key-->
<meta-data
    android:name="pico_pay_key"
    android:value="APP SECRET"/>            //Replace APP SECRET with APPSECRET applied by the application
<!--APPID-->
<meta-data
    android:name="pico_app_id_foreign"
    android:value="APP ID"/>
<!--APPKEY-->
<meta-data
    android:name="pico_app_key_foreign"
    android:value="APPK EY"/>
<!--Authorization Scope-->
<meta-data
    android:name="pico_scope_foreign"
    android:value="SCOPE"/>
<!--Developer ID-->
<meta-data
    android:name="pico_merchant_id_foreign"
    android:value="DEVELOPER ID"/>
<!--Payment Key-->
<meta-data
    android:name="pico_pay_key_foreign"
    android:value="APP SECRET"/>
Note: In this configuration file, pico_pay_key/ pico_pay_key_foreign corresponds to AppSecret on the developer platform.
Example:
<?xml version="1.0" encoding="utf-8"?>
<manifest xmlns:android="http://schemas.android.com/apk/res/android"
      package="com.your.package">
<application
    android:allowBackup="true"
    android:icon="@mipmap/ic_launcher"
    android:label="@string/app_name"
    android:supportsRtl="true"">
<!-- China -->
<!--APP ID-->
<meta-data
    android:name="pico_app_id"
    android:value="Add your appid here"/>
<!--APP key-->
<meta-data
    android:name="pico_app_key"
    android:value="Add your appkey here"/>
<!--Scope-->
<meta-data
    android:name="pico_scope"
    android:value="get_user_info"/> <!--This is fixed-->
<!--Merchant ID-->
<meta-data
    android:name="pico_merchant_id"
    android:value="Add your developer id here"/>
<!--Pay Key-->
<meta-data
    android:name="pico_pay_key"
    android:value="Add your appSecret here"/>
<!-- Release area -->
<meta-data
    android:name="pico_app_id_foreign"
    android:value="Add your appid here"/>
<meta-data
    android:name="pico_app_key_foreign"
    android:value="Add your appkey here"/>
<meta-data
    android:name="pico_scope_foreign"
    android:value="get_user_info"/><!--This is fixed-->
<meta-data
    android:name="pico_merchant_id_foreign"
    android:value="Add your developer id here"/>
<meta-data
    android:name="pico_pay_key_foreign"
    android:value="Add your appSecret here"/>
</application>
</manifest>
9.2 Use of payment system
The process of payment system is relatively complicated, and we have specially provided a Demo for reference. Expand Assets> Pxr_Payment>Demo>Scenes to open the Demo scenes as follows:
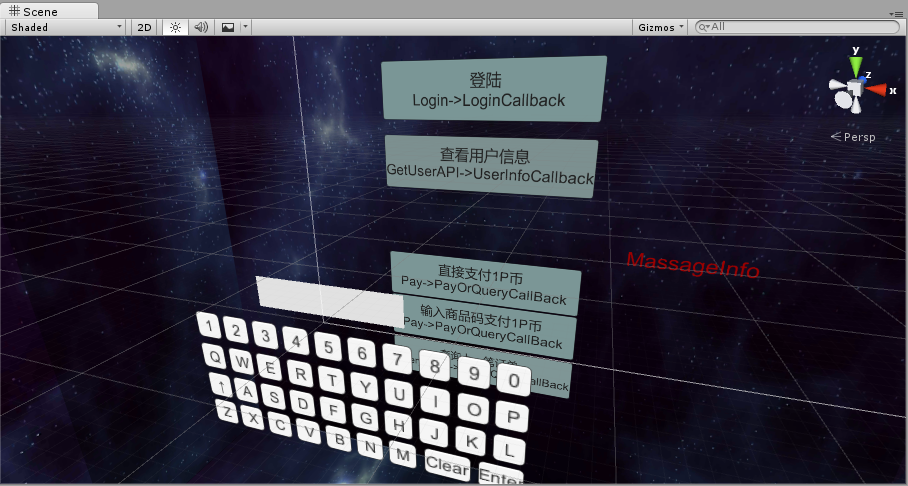
Figure 9.4 Payment of Demo
In the above figure, the left side of each button represents the method to be called and the right side represents the callback method. When the developer uses the payment system, please refer to the above Demo for implementation.
Note:
1.“There is a Prefab of “PicoPayment” under the Prefabs folder for system callback. Be sure to add this object to the project. And DO NOT modify the prefab name, otherwise callback parameter won’t be accepted”
2.“The “Callback” script bound to PicoPayment preprocesses some of the callback data. If developers need to process other data, please modify the contents of related functions, but the function name cannot be modified. And note that SDK will override this function so please backup the modified content before upgrading SDK”
9.3 Function interface explanation
Callback functions are implemented in “Callback.cs” script file from Pico_Payment folder. Details can be found in Chapter 9.2
9.3.1 Login
Login is the prerequisite of calling the following interfaces. If not logged in or login fails, all other features like retrieving user info or payment would fail.
- Method of calling: void Login()
- Method of callback: void LoginCallback(string LoginInfo)
Among them, LoginInfo is the login information returned from the background. The login demonstration format is as follows:
{"isSuccess": "true or false", when the value is true, it means successful login; when the value is false, it means failed login; "msg": "Corresponding description information"}
Successful examples:
{"isSuccess":"true","msg":"SUCCESS"}
Failure examples:
{"isSuccess":"false","msg":"Network exception"}
9.3.2 Payment
Please note to the login method from Chapter 9.3.1 have been called.
- Method of calling: void Pay(string payOrderJson)
Among them, payOrderJson is the Json string containing order information. The following parameters are the required parameters, including:
| subject | Order title and product overview |
| body | Description of order and detailed description of goods |
| order_id | The order number generated by the developer, which shall not exceed 64 characters. |
| total | The total price of the commodity is an integer greater than 0. It is entered when paying directly, but is not entered when paying by the product code. |
| goods_tag | Commodity label |
| pay_code | The product code must be consistent with the configuration of the developer platform. It is entered when paying directly, but is not entered when paying by the product code. |
Example 1:
Pay ("{'subject': 'Game',' body ': Buy a complete game', 'order_id ':'10000','total ':'10','goods_tag ':'game' }");
Example 2:
Pay ("{'subject': 'Game',' body ': Buy a complete game', ,'order_id ':'10000',','goods_tag ':'game','pay_code':'123' }");
Note: Example 1 is a direct payment method and Example 2 is a payment method using the product code. The two methods cannot be carried out at the same time. The attribute of the product code cannot be filled in during direct payment and the total attribute cannot be filled in or set to 0 when using a product code. The two payment methods must be consistent with the payment types set in the developer platform account.
Note: order_id is unique in the payment system. Therefore, in order to ensure that a single user has a unique order number on the same app, it needs to be named in the form of “openID + custom order number”.
- Method of callback: void QueryOrPayCallback(string queryOrPayInfo)
Among them, queryOrPayInfo is the payment information returned from the background, and the exemplary format is as follows:
{"code ":"12000","msg":"PAY_SUCCESS"} //When the code value is 12000, the payment is successful; Other exception codes for payment failure
List of payment callback code and msg:
| Code | Msg |
|---|---|
| 11001 | USER_NOT_LOGIN_OR_EXPIRED |
| 11004 | MISSING_APP_PARAMETERS |
| 12000 | PAY_SUCCESS |
| 12002 | ENTER_AMOUNT_ERROR |
| 12003 | PCOIN_NOT_ENOUGH |
| 12006 | NOT_ENTER_ORDER_INFO |
| 12007 | PAY_ORDER_EXIST |
| 12008 | PAY_CODE_NOT_EXIST |
| 12009 | PAY_CODE_ALERADY_CONSUMED |
| 14001 | SDK_LOCAL_ERROR |
| 14004 | NETWORK_ERROR |
| 15001 | SYSTEM_ERROR |
| 15003 | SERVICE_APP_PARAMETER_NOT_MATCH |
9.3.3 Order query
- Method of calling: void QueryOrder(string orderId)
Among them, orderId is the order number to be querieds
- Method of callback: void QueryOrPayCallback(string queryOrPayInfo)
Among them, queryOrPayInfo returns order information for the background in the following format:
- code: When the value is 13000, the query order is successful. Other exception codes for payment failure
- msg: When the code is 13000, msg returns the json string of order information; when the code is other values, return to the corresponding description information
{"code ":"13000","msg":"json string of user information "}
When the code is 13000, the json string of msg’s order information is as follows:
{
"trade_no":"22016082314719505878171324",// Pico Payment order No.
"open_id":"4f3148bdc34d9bca104927729a173b64",
"ret_msg":"",
"coupon_fee":0.00,
"fee_type":"PIC",
"pay_time":1471950587000,// Payment completion time
"nonce_str":"yiUzuv4VQO1OXBAzVyZSRztOmRgIOioT",
"out_trade_no":"12345678903", // Order number of merchant
"trade_status":"SUCCESS",//SUCCESS—Successful payment
"trade_type":"EGG",
"result_code":"SUCCESS",
"mch_id":"company_id",
"ret_code":"SUCCESS",
"sub_msg":"OK",
"total_fee":100.00,// Total order amount
"app_id":"bf18ac2de375095d63428134e44d1867",
"sub_code":"SUCCESS",
"receipt_fee":100.00,// Paid-in amount
"buyer_pay_fee":100.00// The amount paid by the buyer
}
When code is other values, the json string of msg’s order information is as follows:
{"code ":"13006","msg":"QUERY_ORDER_NOT_EXIST"}
Code and msg for query:
| Code | Msg |
|---|---|
| 11001 | USER_NOT_LOGIN_OR_EXPIRED |
| 13000 | QUERY_ORDER_SUCCESS |
| 13003 | NOT_ENTER_ORDER_ID |
| 13006 | QUERY_ORDER_NOT_EXIST |
| 14001 | SDK_LOCAL_ERROR |
| 14004 | NETWORK_ERROR |
| 15001 | SYSTEM_ERROR |
| 15003 | SERVICE_APP_PARAMETER_NOT_MATCH |
9.3.4 Get user information
Please note to the login method from Chapter 9.3.1 have been called.
- Method of calling: void GetUserAPI()
- Method of callback: void UserInfoCallback (string userInfo)
Among them, userInfo is the user information returned from the background, which is an unprocessed Json string. Among them, openid is the unique identifier of the user in the current application (if necessary, this value will be changed when the application changes the appid. Please pay attention). When the query is successful, the exemplary format is as follows:
{"ret_code":"0000",
"data":{
"aboutme":"",
"birthday":1460476800000,  // Long type value, date of birth, default time is the zero point of a certain year or month
"phone":"13100000000",      // Mobile phone number is required for registered users using mobile phones.
"username":"Admin",                 // The user name can be modified by the user
"email":"",                                 // Mailbox is required for users to register with mailbox
"gender":"male",
"lastname":"",
"openid":"4f3148bdc34d9bca104927729a173b64",        // Unique identification of user, required
"firstname":"",
"avatar":"http://172.31.83.11/upload/6dd6ee103714e967846c3d38ae48d511",
"country":"China",          // The country can be set up on the official website
"city":""                           // The city can be set on the official website
},
"ret_msg":" Call success "
}
When the query fails, there is no data part. The exemplary format is as follows:
{
"ret_code":"5000",
"ret_msg":"SYSTEM_ERROR"
}
ret_code and ret_msg are listed as follows:
| ret_code | ret_msg |
| 0000 | REQUEST_SUCCESS |
| 5000 | Error message returned by server |
9.4 Developer server interaction
After the payment is completed, the payment system will send the relevant payment results and user information to the merchant, and the merchant needs to receive and process them and return a response.
When the background notifies the interaction, if the receiving of the merchant’s response by the payment system receives is not successful or overtime, the notification should be considered as failed, and the payment system will periodically re-initiate the notification through certain policies to maximize the success rate of the notification, but it may not guarantee that the notification will be eventually successful.
The same notification may be sent to the merchant system repeatedly and the merchant system must be able to process duplicate notifications correctly. The recommended practice is to firstly check the status of the corresponding service data when it receives and processes the notification, and determine whether the notification has been processed, it should be re-processed if it has not been processed, and the result return will be successful directly if it has been processed. Before the status check and processing of business data, data locks should be used for concurrency control to avoid data confusion caused by function reentry.
The merchant server needs to implement the following interface for receiving the request from the Pico server and get the payment result and user information of the Pico payment system:
| Name | Payment result callback interface | |||||||||
| Request type | POST | |||||||||
| Request URL | Pay, parameter notify_url transmitted by PayOrder | |||||||||
| Request format | JSON | |||||||||
| Return format | JSON | |||||||||
| Is login required | Yes | |||||||||
| Request parameter | For details, see the following “Table 9.1 Returned parameter information in the payment result notification” | |||||||||
| Return Params |
|
|||||||||
| Return parameter example | {“ret_code”: “SUCCESS”,”ret_msg” : “OK”} | |||||||||
| Update instruction |
Table 9.1 Returned parameter information in the payment result notification
| Field Name | Param Name | Required | Type | Description |
|---|---|---|---|---|
| Return Status Code | ret_code | Yes | String | SUCCESS/FAIL This field is a notification identification, not a trade identification. The result_code is used to determine whether a trade is successful. |
| Return Message | ret_msg | No | String | Return message, if not empty, then it’s the reason of the error: Name failed – param format validation error |
| Error Code | sub_code | No | String | Error code |
| Error code description | sub_msg | No | String | The description of the error return message |
| Pico pay order number | trade_no | Yes | String | Pico payment order number |
| Merchant order number | out_trade_no | Yes | String | The internal order number in merchant system |
| App ID | app_id | Yes | String | The app APP_ID that the platform has audited |
| Merchant ID | mch_id | Yes | String | The merchant ID that the payment assigned |
| User ID | open_id | Yes | String | The unique ID of the user under the merchant’s appid |
| Device ID | device_id | No | String | The ID of the terminal device |
| Random string | nonce_str | Yes | String | Random string, less than 32 chars. Random number generation algorithm is recommended. |
| Name | Name | Yes | String | Name, see details in Name generation algorithm. |
| Business Result | result_code | Yes | String | SUCCESS/FAIL |
| Trade Type | trade_type | Yes | String | Payment type |
| Currency Type | fee_type | Yes | String | Currency type |
| Total Fee | total_fee | Yes | String | Total order amount |
| Actual Fee | receipt_fee | Yes | String | Actual Fee |
| The amount of the fee the buyer paid | buyer_pay_fee | No | String | The amount of the fee the buyer paid |
| Voucher or Discount Amount | coupon_fee | No | String | Vouchers or Discount Amount |
| Merchant Packet | attach | No | String | Merchant packets, returning as-is |
| Pay completion time | pay_time | Yes | String | The time that payment completes, the format is “yyyy-MM-dd HH:mm:ss” |
Table 9.2 Returned Results
| Field Name | Param | Required | Type | Description |
|---|---|---|---|---|
| Return status code | ret_code | Yes | String | SUCCESS/FAIL SUCCESS represents that the merchant has successfully received notification and validated. |
| Return message | ret_msg | No | String | Return message, if not empty, then it’s the reason of error: Name failed - parameter format validation error |
Special remarks: The signature verification must be performed for the contents of the payment result notification in the merchant system to prevent “false notification” due to data leakage and capital loss.
The function name verification rule is as follows:
- Remove the signature parameter from the returned list of parameters, and simultaneously add key = “app_secret”, value=paykey, then sort it naturally according to the key value, separate the multiple parameters with &, and finally take MD5 encryption
- Compare the encrypted string with the get signature
The name of the function is as follows:
/**
* result: the map collection of retrieved data
* paykey: It’s the paykey on the developer platform
*/
/**
    public static String createSign(Map<String, Object> result, String paykey)
    {
if (result == null || result.size() == 0)
    return null;
result.put("app_secret", paykey); //1.Add key = “app_secret”, value=payke
String sign = result.get("Name");//2.Save Name value, to be used for validation
result.remove("Name"); //3.remove Name parameter
String[] tmp = new String[result.size()];
int i = 0;
for (String key : result.keySet())
{
    tmp[i++] = key;
}
Arrays.sort(tmp); //4.natural sort
String signTemp = "";
for (String string : tmp)
{
    if (result.get(string) == null)
        continue;
    signTemp += string + "=" + URLEncoder.encode(result.get(string).toString()
        , "utf-8") + "&";
}
if (signTemp.endsWith("&"))
    signTemp = sign.substring(0, signTemp .length() - 1);
Log.i(TAG, "createSign: " + signTemp );
String localSign = MD5.MD5(sign); //5.generate MD5 encrypted string
return localSign.equal(sign);//6.validate with “sign” in 2
    }