9 Payment system
Pico payment is a game currency payment system based on the Pico account system, and the settlement method is based on the current game currency unit under Pico (P currency). If the project requires internal purchasing function, please read the contents of this chapter carefully. If the project does not require internal purchasing function, please ignore this chapter.
9.1 Preparations
9.1.1 Get the string used for payment
- APP ID : Unique identifier generated by the developer platform for the application
- APP KEY : Key generated by the developer platform for the application
- APP Secret : Key generated by the developer’s platform for the application to be used for payment
- Publisher ID : Developer’s ID, also called Merchant ID
9.1.2 Apply to become a Pico developer
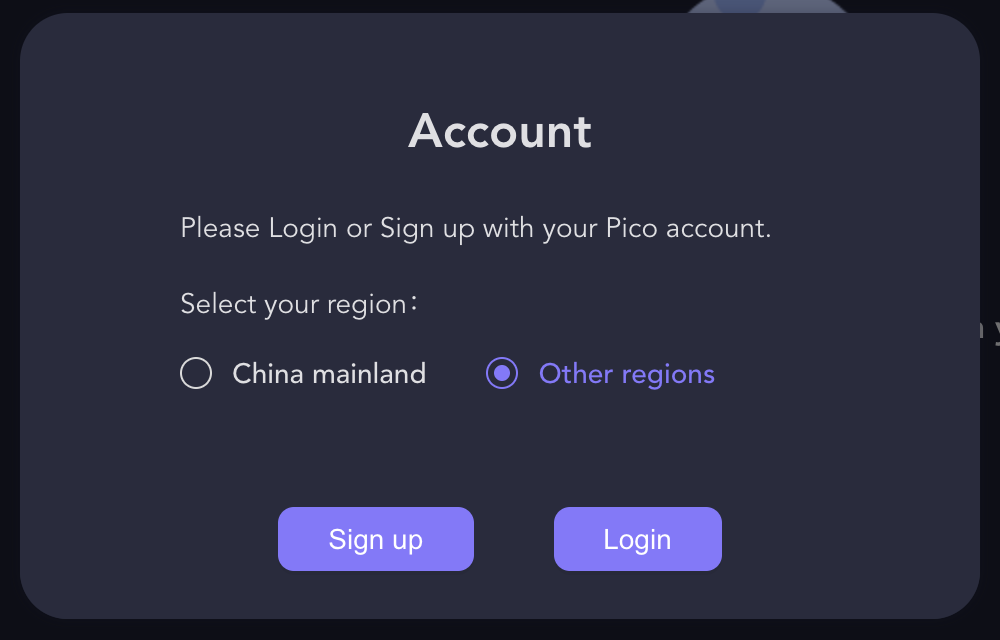
If you wish to publish your app to the Pico Store, you will need to create a developer account and log in to the Pico Developer Platform.
- Click the Become a Developer button on the Pico Developer Platform.
- In the Account pop-up window, select the region where your account is located: China mainland / Other regions and click the Sign up button.
- Verify your account
- If you choose Other regions, you need to fill in your email address and set your password, and select the country/region where your account is located, and verify your email account by verification email.
- If you choose China mainland, you need to fill in your cell phone number and set your password, and verify your cell phone number by SMS. .. image:: _static/9.1.2.2.png
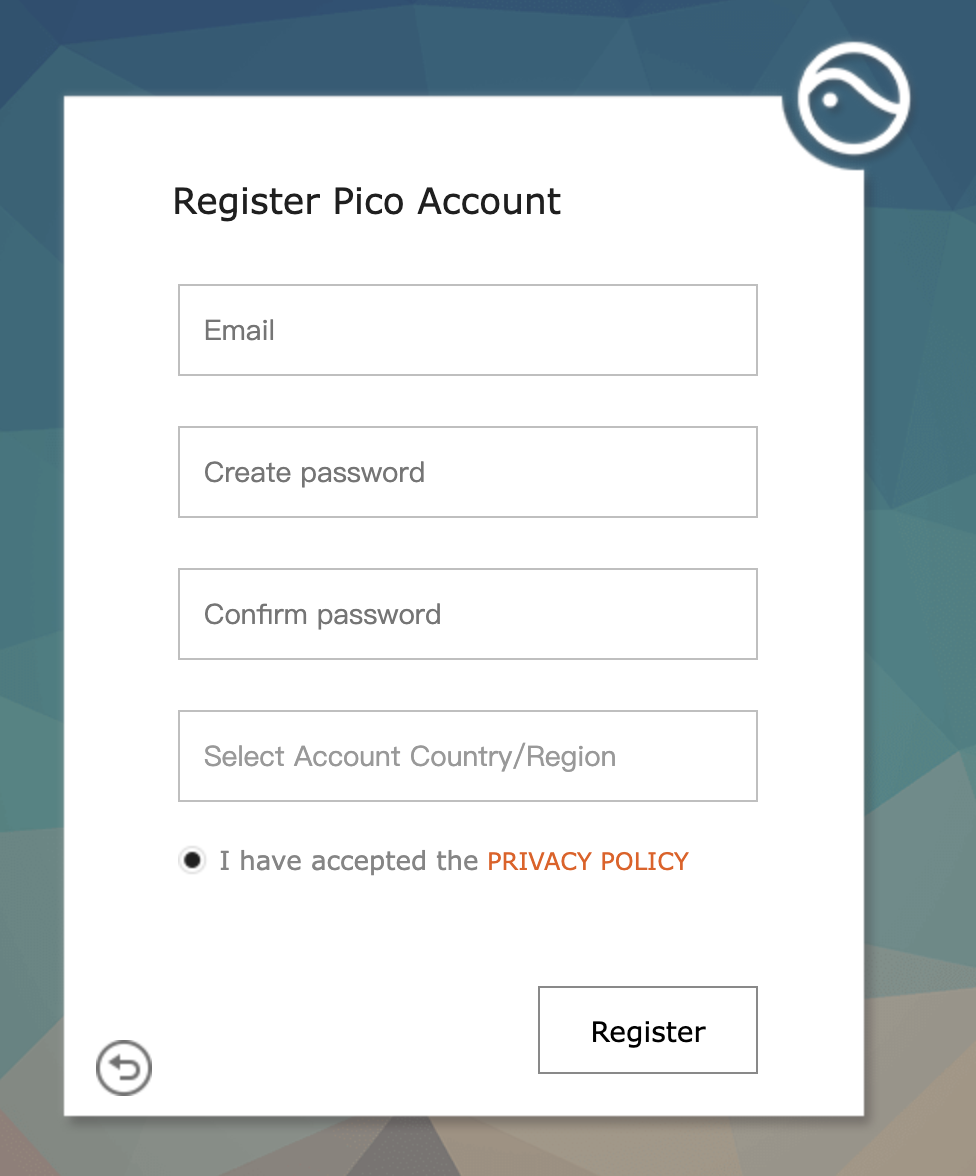
- Check the box to accept Pico PRIVACY POLICY and click the Register button.
- Check your Email for the verification sent to you to complete your registration.
- Congratulations! You are now officially a Pico developer.
Note: Pico developer account registration is completely FREE.
9.1.3 Get application parameters
- Get Publisher ID
After applying as a developer, enter the developer management platform, click on “My Apps”, enter “Apps” and click on the “API” menu to see the developer ID, which will be used as a unique mark for merchants in the payment system.
- Create application, select payment type
Developers can enter the application creation phase from the management center. After clicking Create Application, then enter the corresponding platform to perfect the relevant information of application:
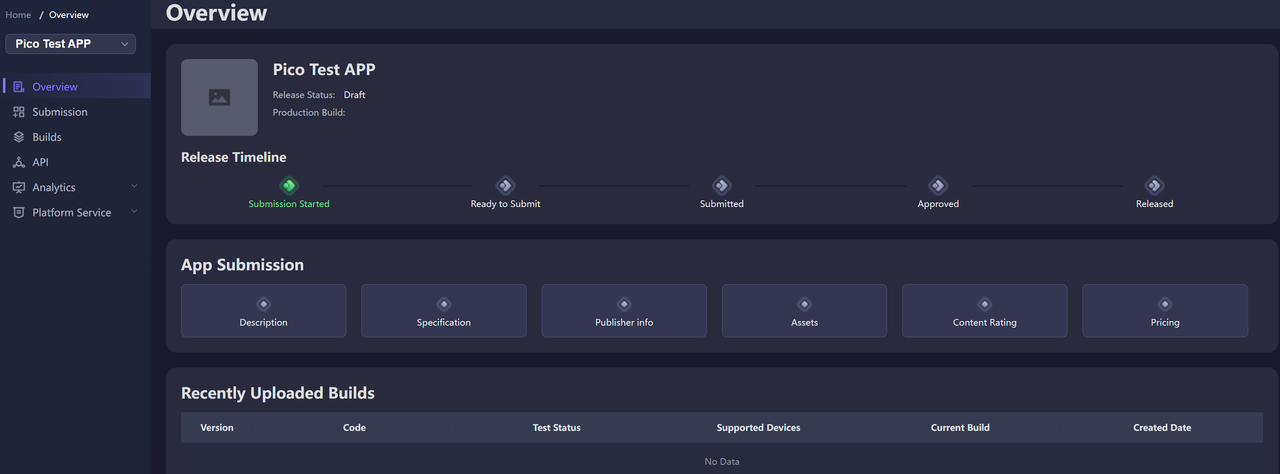
Figure 9.1 Information about application improvement
Note: Please fill out the application type carefully, and it can’t be modified once you fill it out!
- Select the application. Pay directly using the P-Coin amount.
- Select the game. Use product code to pay. Product code is the unique identification of developer’s backend for paid props in the game.
For in-app purchase of game applications, developers should add commodity codes for unified management in the developer backend.
The product code payment configuration interface is as follows:
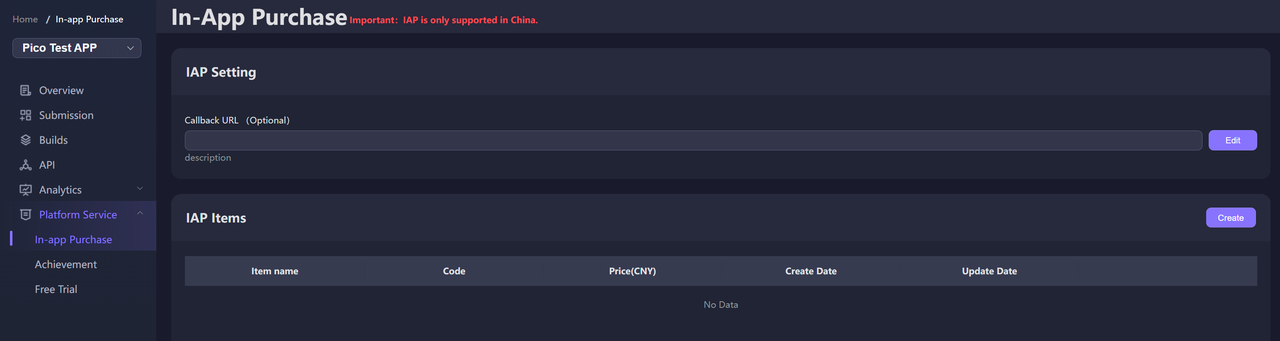
Figure 9.2 In-app purchase configuration
Product code definition rules:
- The first digit is a letter, only letters and numbers are allowed, and it should be no more than 20 characters
- The product code between different props cannot be repeated
- The prop types are divided into consumable prop and non-consumable prop. Consumable prop are reusable commodities, such as gold currency, blood bottle, etc. Non-consumable props are disposable purchased products, such as weapons and unlocking levels.
- Get APP ID, APP KEY, APP Secret parameters
After successfully creating an application, the developer platform will assign APP ID, APP KEY, APP Secret parameters for the current application.
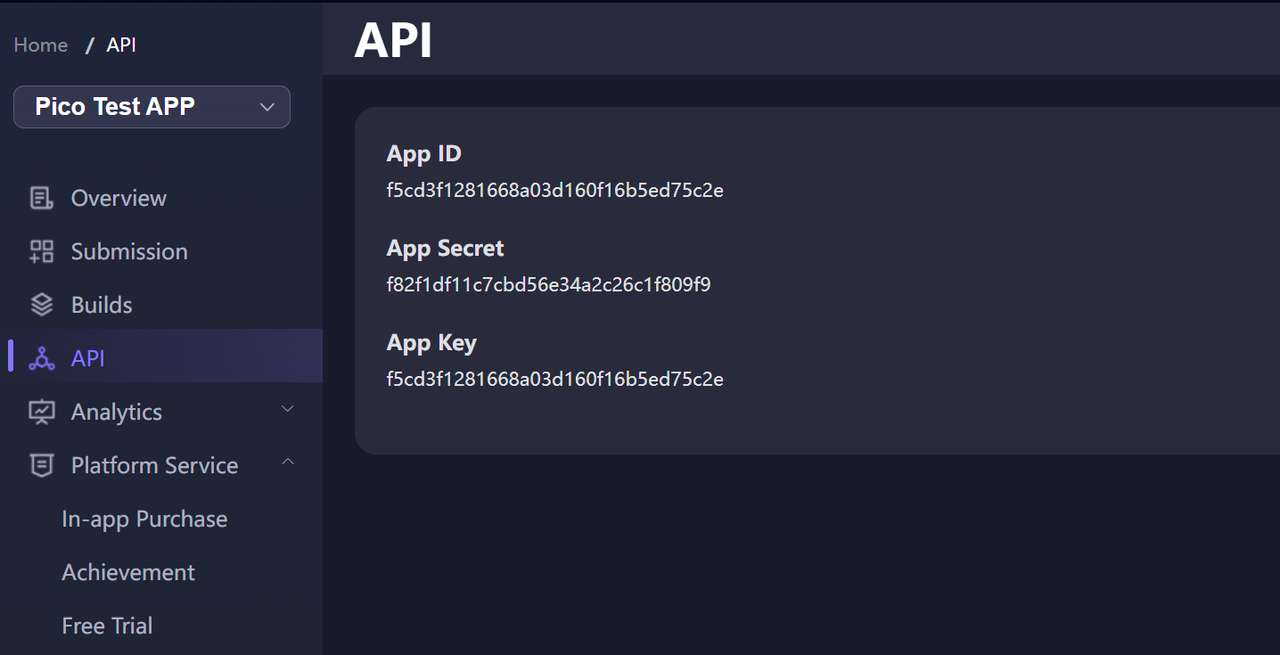
Figure 9.3 APP ID、APP KEY、APP Secret
Now, you have obtained Publisher ID, APP ID, APP KEY and APP Secret.
9.1.4 Configure application parameters in AndroidManifest.xml
Enter Edit -> Project Settings…, Expand option OnlinePico Settings under Plugins, check “Enable Payment Module”, select actual Region accordingly. To release in Mainland China, select “China”, to release in other regions select “NonChina”. Select “Both” to release globally.

Figure 9.4 Select publishing region
Populate Merchant ID (Developer ID), APPID, APP KEY, APP secret to following secitons:
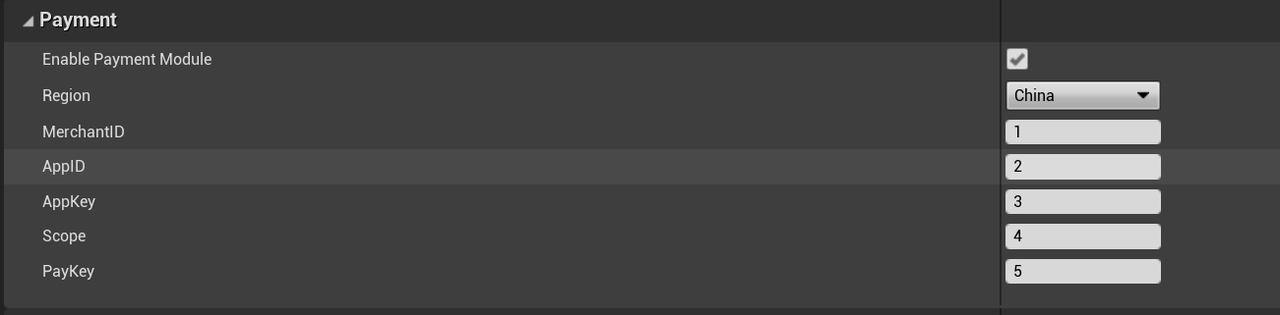
Figure 9.5 Fill in attibutes
9.2 Use of payment system
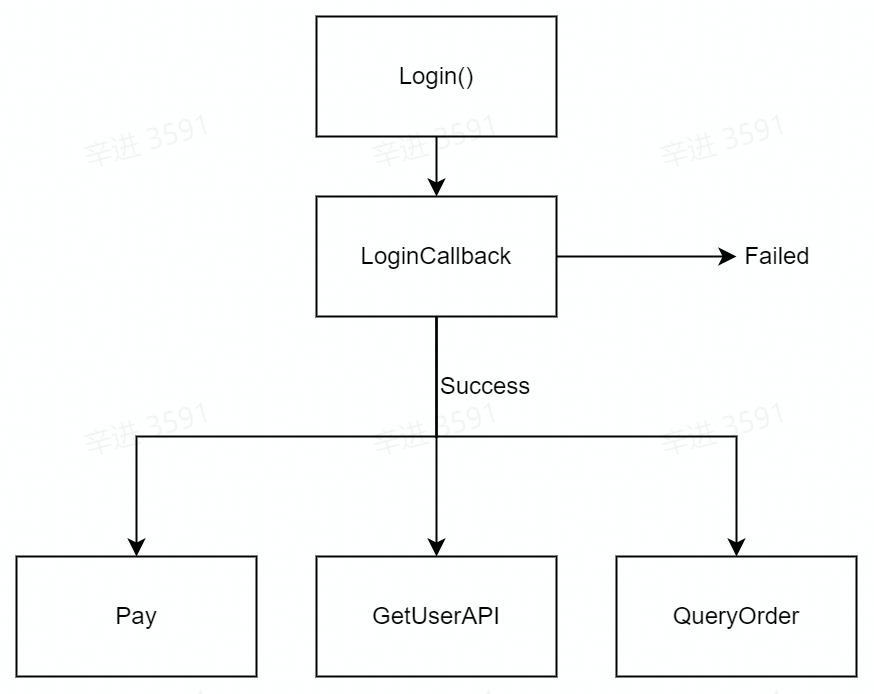
Figure 9.6 Workflow of payment system
- Firstly, make sure Login API (Pico Login SDK, Pico Paymen Login) returns the success result, then call other payment APIs including pay (Pico Payment Pay with Coin、Pico Payment Pay with Pay Coin), query (Pico Payment Query), get user info (Pico Payment Get User Info、Pico SDKGet User Info) etc.
- If logout is needed after logging in, call logout APIs (Pico Logout SDK、Pico Payment Logout).
- All above APIs mentioned need to bind corresponding callback events to acquire result. Details can be found in chapter 9.3
9.3.1 Register
Pico provides developers with Oauth2.0-based authentication and authorization, therefore, the users need to log in before paying, and here the Pico Payment Login node or Pico Login SDK node we provide should be used:
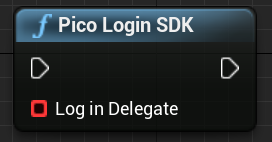
Pico Login SDK
Execute login action and bind callback event to acquire login result.
Blueprint:
Input:
Delegate:
- Log in Delegate:Bind Login callback event as follow:

- Callback event params:
- Bool:
- IsSucceed:
- true:Success
- false:Failure
- IsSucceed:
- FString:
- Reason: Use FString to print failure reason. Details can be found in Table 9-1 Reason Code
- Bool:
Output: None
Return: None
Pico Payment Login
Execute login action and bind callback event to acquire login result.
Blueprint:
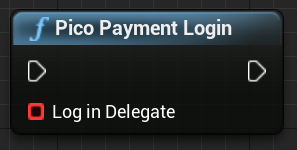
Input:
Delegate:
- Log in Delegate:Bind Login callback event as follow:
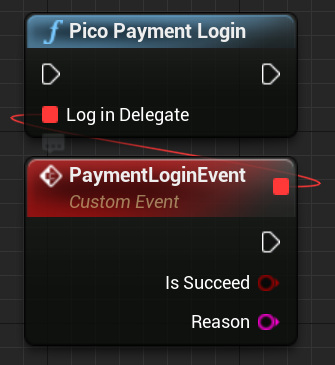
Callback event params:
Bool:
- IsSucceed:
- true:Success
- false:Failure
- IsSucceed:
FString:
- Reason: Use FString to print failure reason. Details can be found in Table 9-1 Reason Code
Output: None
Return: None
9.3.2 Logout
Log out action can be executed with PicoLogoutSDK or PicoPaymentLogout:
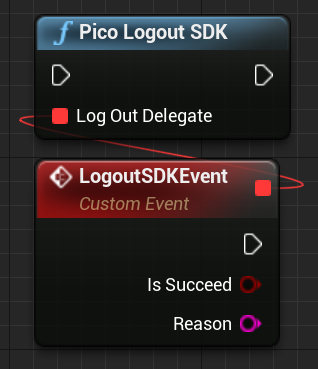
Pico Logout SDK
Execute login action and bind callback event to acquire login result.
Blueprint:
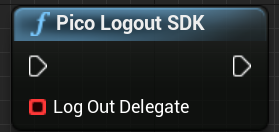
Input:
Delegate:
- Log out Delegate:Bind logout callback event as follow:

- Callback event params:
- Bool:
- IsSucceed:
- true:Success
- false:Failure
- FString:
- Reason: Use FString to print failure reason. Details can be found in Table 9-1 Reason Code
- IsSucceed:
- Bool:
Output: None
Return: None
Pico Payment Logout
Execute login action and bind callback event to acquire login result.
Blueprint:
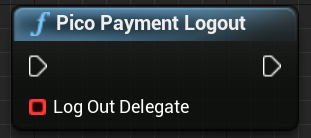
Input:
Delegate:
- Log out Delegate:Bind logout callback event as follow:
- Callback event params:
- Bool:
- IsSucceed:
- true:Success
- false:Failure
- FString:
- Reason: Use FString to print failure reason. Details can be found in Table 9-1 Reason Code
- IsSucceed:
- Bool:
Output: None
Return: None
| Error Message | Description | Reason |
|---|---|---|
| TIME_ERROR | Timestamp Error | Local timestamp and server timestamp have 8 minute or more gap |
| SYSTEM_USER_NOT_FIND_ERROR | User not found | User not exist for specified tokent |
| SYSTEM_USER_TOEKN_NOT_FIND_ERROE | User token not found | User token not found |
| SYSTEM_USER_TOKEN_CHECK_FAILURE_ERROR | User token verify failed | User token not valid |
| SYSTEM_USER_TOKEN_UNKNOWN_ERROR | User token verify failed | User token verify failure |
| APP_CHECK_ERROR | Application verify failed | Parameters like APP ID are incorrect |
Table 9-1 Reason Code
9.3.3 Payment
Pico Payment Pay with Coin
Pay in P coins
Blueprint:
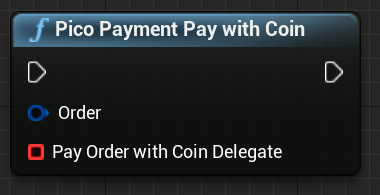
Input:
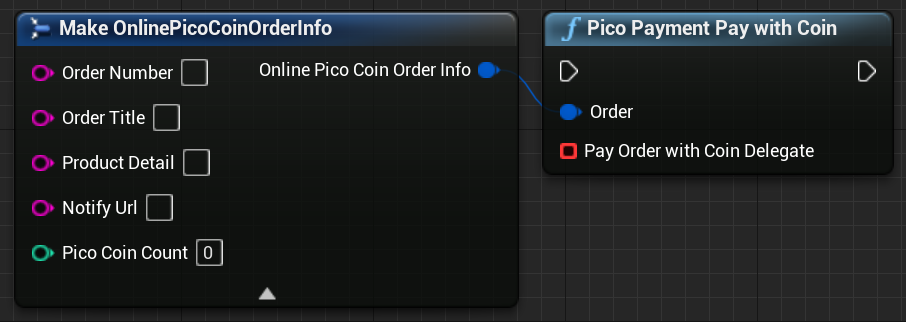
FString:
- OrderNumber: The characters of the order number defined by the merchant. The size is limited within 32 characters, which may contain letters and numbers.
- OrderTitle: Order title
- ProductDetail: Product detail
- Notify Url: The URL to be notified must be a directly accessible URL and cannot be provided with parameters. It is not required.
Int:
- PicoCoinCount:Paid P coin
Delegate:
- Pay Order with Coin Delegate:Bind callback event as follow
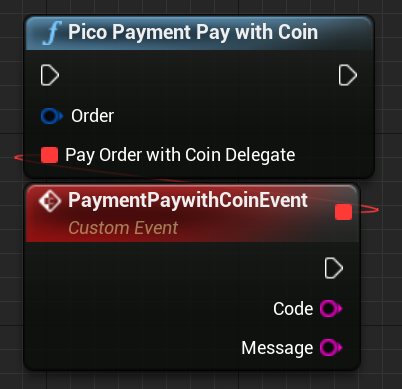
- Callback event params:
- FString:
- Code:Check table 9.2 for details
- Message:Check table 9.2 for details
- FString:
Output: None
Return: None
Pico Payment Pay with Code
Pay in Pay code
Blueprint:
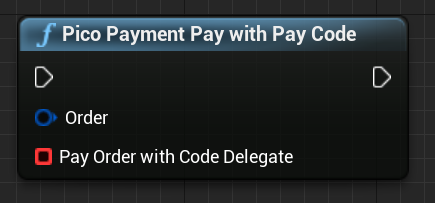
Input:
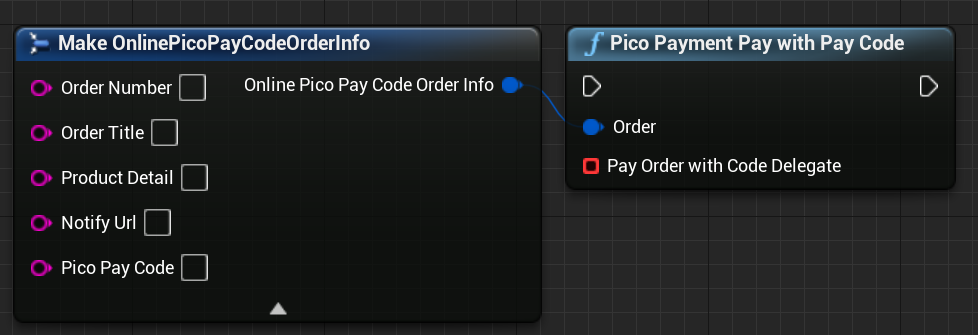
FString:
- OrderNumber: The characters of the order number defined by the merchant. The size is limited within 32 characters, which may contain letters and numbers.
- OrderTitle: Order title
- ProductDetail: Product detail
- Notify Url: The URL to be notified must be a directly accessible URL and cannot be provided with parameters. It is not required.
- PicoPayCode: The product code, which the user can acquire through the 9.1.1 in-game payment configuration.
Delegate:
- Pay Order with Coin Delegate:Bind callback event as follow:
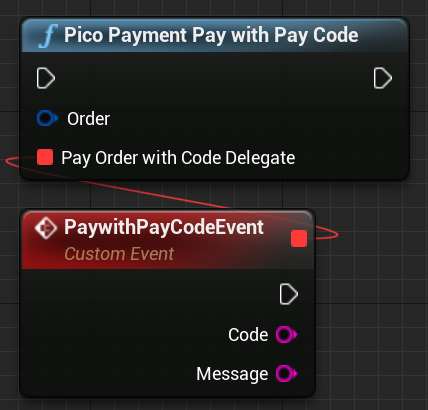
- Callback event params:
- FString:
- Code:Check table 9.2 for details
- Message:Check table 9.2 for details
- FString:
Output: None
Return: None
Code and Msg are as follows:
| Code | Message |
|---|---|
| 00000 | Network error |
| 10000 | Log-in is successful |
| 10001 | User does not log in |
| 10002 | Please enter the correct amount |
| 10003 | Log-in has been expired, please re-log in |
| 11000 | Merchant verification is successful |
| 11001 | Merchant verification failure |
| 11002 | User authentication parameter is wrong or request has been expired |
| 11003 | Merchant is not verified |
| 12000 | Payment is successful |
| 12001 | Payment failure |
| 12003 | P currency is insufficient |
| 12004 | Balance is available |
| 13000 | The order is generated |
| 13001 | Get acquisition failure |
| 13002 | The order generation failure |
| 14000 | The order query is successful |
| 14001 | There is no order / the order is wrong |
| 14002 | The user cancels payment operation |
| 15000 | The product information is not entered |
| 15001 | The prepaid ID is not entered |
| 15002 | Please enter the Pico payment order number or merchant order number |
| NOAUTH | The merchant does not have the interface permission |
| SYSTEMERROR | The system is wrong |
| APP_ID_NOT_EXIST | There is no APP_ID |
| MCHID_NOT_EXIST | There is no MCHID |
| APP_ID_MCHID_NOT_MATCH | App_id and mch_id are mismatched |
| LACK_PARAMS | The parameters are lacked |
| SIGNERROR | The signature is wrong |
| NO_DATA | No data is found / the user does not recharge |
| ORDER_EXIST | There has been an order |
| PAY_CODE_NOT_EXIST | There is no consumption code |
| PAY_CODE_EXIST | The user has consumed the product code |
Table 9-2 Code and Message map
9.3.4 Order query
Pico Payment Query Order
Query payment order from server
Blueprint:
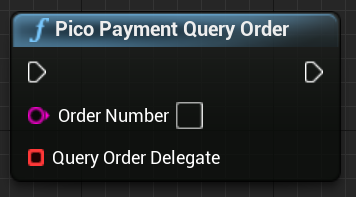
Input:
FString:
- Order Number:Order number in String
Delegate:
- Query Order Delegate:Bind callback event as follow:
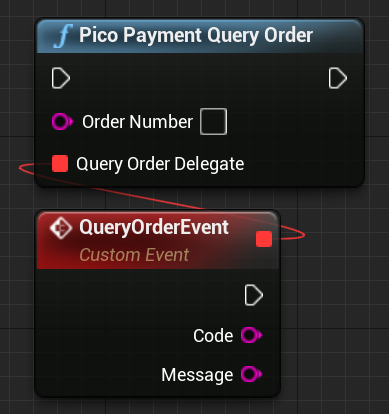
- Callback event params:
- FString:
- Code:Check table 9.2 for details
- Message:Check table 9.2 for details
- FString:
Output: None
Return: None
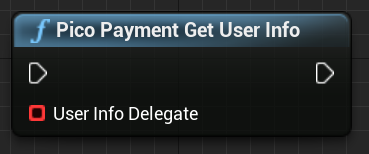
9.3.5 Get user information
Pico Payment Get User Info
Blueprint:

Input:
Delegate:
- User Info Delegate:Bind callback event as follow:
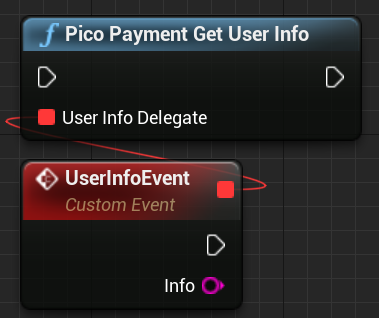
- FString:
- Info:an unprocessed json string(string)check result in table 9.3
Output: None
Return: None
Pico SDKGet User Info
Blueprint:
Input:
Delegate:
- User Info Delegate:Bind callback event as follow:

- FString:
- Info:an unprocessed json string(string)check result in table 9.3
Output: None
Return: None
- Info: An unprocessed Json string. Here is an example of a successful query:
{"ret_code":"0000",
"data" : {
      "aboutme":"",
              "birthday" : 1460476800000,
              "phone" : "13100000000",
              "username" : "Admin",
              "email" : "",
              "gender" : "male",
              "lastname" : "",
              "openid" : "4f3148bdc34d9bca104927729a173b64",
              "firstname" : "",
              "avatar" : "http://172.31.83.11/upload/6dd6ee103714e967846c3d38ae48d511",
              "signature" : "14a25d7219d8dfc91e55f63286ae5c0a",
              "country" : "China",
              "city" : ""
},
"ret_msg":"Successful call"
}
The query failure example is as follows:
{
"ret_code":"00003000",
"ret_msg" : "Signature verification failure"
}
List of other ret_code codes and ret_msg:
| ret_code | ret_msg |
|---|---|
| 0000 | Successful request |
| 00020000 | Database operation failure |
| 9999 | System error |
| 00001000 | Parameter error |
| 00002000 | Data parsing failure |
| 00003000 | Signature verification failure |
| 00003001 | Time verification failure |
| 00060000 | User not found |
| 00060001 | User password error |
| 00060002 | Unknown user login error |
| 00061000 | User token finding failure |
| 00061001 | User token verification failure |
| 00061002 | Unknown user token error |
| 00070001 | Application verification failure |
| 00071001 | Application key verification failure |
| 00080001 | OAUTH_CODE verification failure |
| 00090001 | REFRESH_TOKEN verification failure |
| 00100001 | ACCESS_TOKEN verification failure |
| 00110001 | SCOPE verification failure |
Table 9.3 On Pico Get User Info Callback output parameter ret_code code and ret_msg list
9.4 Developer server interaction
After the payment is completed, the payment system will send the relevant payment results and user information to the merchant, and the merchant needs to receive and process them and return a response.
When the background notifies the interaction, if the receiving of the merchant’s response by the payment system receives is not successful or overtime, the notification should be considered as failed, and the payment system will periodically re-initiate the notification through certain policies to maximize the success rate of the notification, but it may not guarantee that the notification will be eventually successful.
The same notification may be sent to the merchant system repeatedly and the merchant system must be able to process duplicate notifications correctly. The recommended practice is to firstly check the status of the corresponding service data when it receives and processes the notification, and determine whether the notification has been processed, it should be re-processed if it has not been processed, and the result return will be successful directly if it has been processed. Before the status check and processing of business data, data locks should be used for concurrency control to avoid data confusion caused by function reentry.
The merchant server needs to implement the following interface for receiving the request from the Pico server and get the payment result and user information of the Pico payment system:
| Name | Payment result callback interface | |||||||||
| Request type | POST | |||||||||
| Request URL | Pay, parameter notify_url transmitted by PayOrder | |||||||||
| Request format | JSON | |||||||||
| Return format | JSON | |||||||||
| Is login required | Yes | |||||||||
| Request parameter | For details, see “Table 9.3 notification parameters in payment result notification” | |||||||||
| Return parameter: |
For details see “Table 9.4 Return results” |
|||||||||
| Return parameter example | { “ret_code”:”SUCCESS”, “ret_msg”:”OK” } | |||||||||
| Update instruction |
Table 9.4 Interfaces that the merchant server needs to implement
| Field name | Variable name | Required | Type | Description |
|---|---|---|---|---|
| Return status code | ret_code | Yes | String | SUCCESS/FAIL This field is the communication identifier, rather than transaction identifier. The success of the transaction should be determined based on the check on result code |
| Return information | ret_msg | No | String | Return error information if not empty, the cause could be Signature failure and parameter format check error. |
| Error code | sub_code | No | String | Error code |
| Error code description | sub_msg | No | String | Wrong returned information error |
| Pico payment order number | trade_no | Yes | String | Pico payment order number |
| Merchant order number | out_trade_no | Yes | String | The order number within the merchant system |
| Application ID | app_id | Yes | String | Application APP_ID approved by the platform |
| Merchant ID | mch_id | Yes | String | Assigned merchant number for payment |
| User identifier | open_id | Yes | String | Unique identifier of the user under the merchant appid |
| Device number | device_id | No | String | Terminal device number |
| Random string | nonce_str | Yes | String | Random string: no longer than 32 bits.Recommended random number generation algorithm. (https://pay.weixin.qq.com/wiki/doc/api/app/app.php?chapter=4_3) |
| Signature | signature | Yes | String | For signature, see the signature generation algorithm (https://pay.weixin.qq.com/wiki/doc/api/app/app.php?chapter=4_3) |
| Business result | result_code | Yes | String | SUCCESS/FAIL |
| Transaction type | trade_type | Yes | String | Payment type |
| Currency type | fee_type | Yes | String | Currency type |
| Total amount | total_fee | Yes | String | Total order amount |
| Paid-in amount | receipt_fee | Yes | String | Paid-in amount |
| The amount paid by the buyer | buyer_pay_fee | No | String | The amount paid by the buyer |
| Voucher or discount | coupon_fee | No | String | Voucher or discount |
| Merchant data package | attach | No | String | Merchant data package, returned as it is |
| Payment completion time | pay_time | Yes | String | Payment completion time, in the format: yyyy-MM-dd HH: mm:ss |
Table 9.5 Notification parameters in payment results notification
| Field name | Variable name | Required | Type | Description |
|---|---|---|---|---|
| Status code returned | ret_code | Yes | String | SUCCESS/FAIL. SUCCESS indicates that the merchant has received and verified the notification successfully. |
| Return information | ret_msg | No | String | Return error information if not empty, the cause could be Signature failure and parameter format check error. |
Table 9.6 Return results
Special remarks: The signature verification must be performed for the contents of the payment result notification in the merchant system to prevent “false notification” due to data leakage and capital loss.
The signature verification rule is as follows:
- Remove the signature parameter from the returned list of parameters, and simultaneously add key = “app_secret”, value=paykey, then sort it naturally according to the key value, separate the multiple parameters with &, and finally take MD5 encryption.
- Compare the encrypted string with the get signature
The signature function is as follows:
/**
* result :Map collection of gotten data
* paykey :i.e. the paykey on the developer platform.
*/
public static String createSign(Map<String, Object> result, String paykey)
{
    if (result == null || result.size() == 0)
        return null;
    result.put("app_secret", paykey);
    String sign = result.get("signature");
    result.remove("signature");
    String[] tmp = new String[result.size()];
    int i = 0;
    for (String key : result.keySet())
    {
        tmp[i++] = key;
    }
    Arrays.sort(tmp);
    String signTemp = "";
    for (String string : tmp)
    {
        if (result.get(string) == null)
            continue;
        signTemp += string + "=" + URLEncoder.encode(result.get(string).toString()
            , "utf-8") + "&";
    }
    if (signTemp.endsWith("&"))
        signTemp = signTemp.substring(0, signTemp.length() - 1);
    Log.i(TAG, "createSign: " + signTemp);
    String localSign = MD5.MD5(sign);
    return localSign.equal(sign);
}